30 Days Of Yoga
Increasing awareness by narrowing the focus….
Life for many of us can be extremely busy and distracted and with the pressures of modern society filling every minute of our day, it is often difficult to carve out quality time for ourselves. The intention that we may wish to give to our Yoga practice is easily lost, particularly if we find it difficult to allow time and the outside world to pause, whilst we stop and focus on our experience – whether in a class or during self-practice.
My intention with 30 Days of Yoga was to encourage a narrowing of focus, taking one set movement/posture per day to give headspace to the experience in the interest of appreciating how our practice really feels. The online experience has changed the way that a teacher can interact with the class and within that, we are all learning to take charge of our practice and be responsible for ourselves in a very different way. I believe that by narrowing our focus and opening up our minds to new experiences within familiar practices, we open up a new arena of endless possibility.
So, my suggestion is to take each daily practice as it arrives, read the outline and guidance and allow at least 10 minutes per day to investigate the offering. Get in touch if you have any questions or would like to feedback your thoughts.
Scroll down and ENJOY!!
Disclaimer
If you are joining me for the first time, please be aware of these important cautions…
The Yoga practice presented in this section is suitable for all levels of ability, however, not all exercises or movements are suitable for everyone and this, or any physical activity may result in injury if not performed mindfully or if pain warnings are ignored. If you are unsure, get in touch or seek medical advice before beginning this practice. These Yoga practices are not suitable for pregnant women. Please seek specialist advice if you are pregnant and would like to take up a Yoga based programme.
Nothing should hurt during this practice. If you experience discomfort or pain during any of the movements, stop, rest and consider how you were approaching the movement – be constantly aware of your body and how it feels, never force or strain and if unsure, consult me directly for help or advice.
Enjoy and don’t forget to feed back your experiences!
Scroll down for most recent practice…
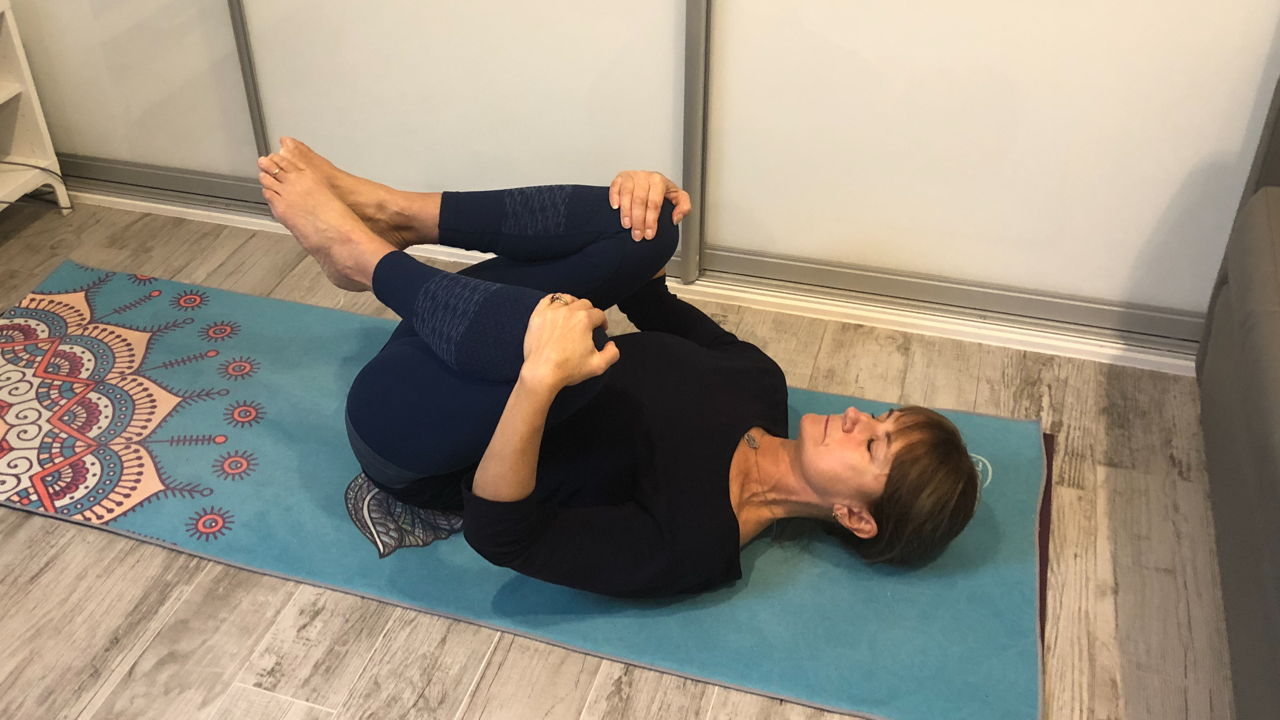
Day 1 – Laying Twist
This variation on the regular floor-based twist encourages the focus of the feet in directing movement from the ground, up through the legs to the hips and through the entire length of the spine via the shoulders and arms. By supporting the movement from the feet, the load to the spine and the upper body is thoughtfully managed, to prevent overload and distress to the lower back. Can be performed on the floor or even on the bed, a comfortable way to ease stiffness in the lower back and a great start/end of day movement.
Benefits
Twists help to lengthen, relax, realign and restore natural balance to the spine, hydrate spinal discs, stimulate circulation, massage and cleanse abdominal organs, promote digestion and can feel great on the whole body!
Awareness
Lay on your back with your knees bent, weight into the back of the head, neck long, arms spread outwards from the shoulders, palms face up, belly soft, feet resting into the ground – a little wider than hip width apart. Eyes closed relax the whole body and take a few moments to settle and become aware of the breath. Be aware of the contact that the back of your body has with the floor – the back of the head, back of the shoulders, arms and hands, back of the ribs, back of the pelvis and the feet. Notice the inward curves of the spine – the space underneath the neck and just above the pelvis in the lower spine. Breathe in and out slowly, noticing how the body spreads and relaxes into the ground with the breath.
Focusing the feet into the ground, move the knees towards the floor on the right side, using the feet to control and guide the movement. Notice how the movement feeds up into the lower spine, pausing the progress of the twist if painful on the lower back – using the feet to control the return to centre. If comfortable, allow the knees to travel all the way to the ground, pause to breathe in, then use the out breath to return through centre and across to the left side, once again using the feet to control the movement. Turn the head away from the legs to allow the twist to travel further into the upper spine, adding an opposing twist into the neck. Use the feet and the breath to slowly guide the twist from side to side, noticing the difference in sensation in each side of the body. Try pausing on the right side for a couple of breaths, noticing how your body responds to the held twist, then repeat to the left and notice if it feels different. Return the legs to centre when you have had enough and hug the knees into the belly.


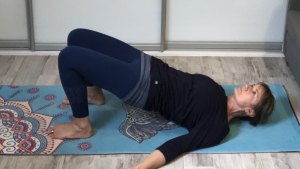
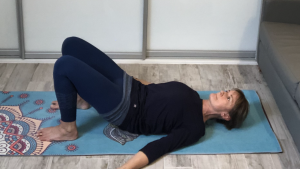
Day 2 – Bridging
This variation on the classic ‘Bridge’ posture mobilises the spine, with awareness spreading upwards from the roots in the feet, through the back of the legs and pelvis to the spine and upper body.
Can be performed on the floor or even on the bed, a great start/end of day movement.
Benefits
Bridging helps to strengthen musculature of the back body whilst, relaxing and releasing through the front body, giving a feeling of openness and space to the chest and abdomen. It lengthens, relaxes, realigns and restores natural balance to the spine, hydrating spinal discs and stimulating circulation. Focusing the breath through the movement helps to calm the mind, aiding relief from stress and anxiety.
Awareness
Start in a back laying position, knees bent, weight into the back of the head, neck long, arms spread outwards from the shoulders, palms face up, belly soft, feet resting into the ground – hip width apart. Eyes closed relax the whole body and take a few moments to settle and become aware of the breath. Breathe in and out slowly, noticing how the breath moves steadily deeper into the front of the body – through the chest, the ribs and into the belly.
Focusing weight down through the feet into the ground, lengthen through the front of the thighs, directing the knees towards the feet, noticing how the back of the pelvis naturally lifts away from the ground – supported through the back of the legs – avoid gripping the buttocks. Inhale then exhale to release the pelvis back to the floor. Pressing down through the feet again, lengthen through the thighs to lift the pelvis, this time allowing the back of the body to steadily rise further away from the ground, pause half way up through the spine, inhale then exhale to release slowly back down to the ground, vertebra by vertebra. Repeat several more times, steadily progressing upwards through the spine into the shoulders. Focus on directing the movement from the feet pressing into the ground, keeping the knees pointing towards the toes, belly relaxed, weight even through the legs and spine, moving consciously with the breath.
Return to the ground when you have had enough and gently hug the knees into the belly.

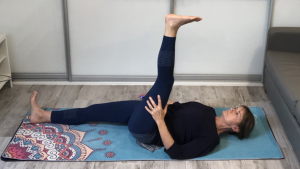
Day 3 – Modified ‘Hand to Big Toe Pose’
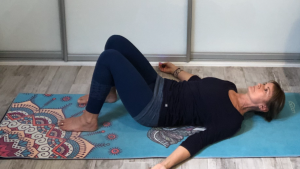
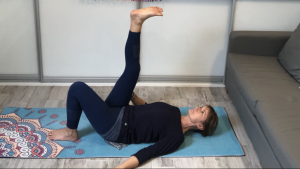
This modified variation of ‘Hand to Big Toe Pose’, brings attention to the whole lower body – from the spine, through the pelvis and into both legs and feet.
Can be performed on the floor or even on the bed, a great start/end of day release, especially if normally spending lots of time sitting!
Benefits
This practice can help to relieve tension and strain in the lower back, hips, thighs, calves and knees. Improves circulation through the groin and legs and creates space in the abdomen, assisting digestion and relieving menstrual tension. May offer relief to nighttime calf cramp and ‘restless legs’.
Awareness
Start in a back laying position, knees bent, feet hip width apart, weight resting evenly through the back of the body from the back of the head, through the shoulders, and ribs into the back of the pelvis and feet. Eyes closed, relax the whole body into the floor and take a few moments to settle, giving awareness to the breath.
Focusing weight down lightly through the left foot, raise the right leg up towards the ceiling, bringing the leg into line with the hip, softening the knee to allow the weight of the leg to rest down into the hip joint, settling the back of the pelvis evenly into the floor, avoiding pushing down into the lower back. Place the right hand lightly to the outside of the thigh for support. Gently flex through the ankle lengthening the heel upwards towards the ceiling, keep the knee soft and relax through the shin. Slowly straighten the left leg, sliding the heel away from the hip, resting the weight of the leg into the ground, relaxing through the buttocks, front and back of the thigh, down through the knee into the shin – rest into the back of the heel. Relax the belly and adjust through the pelvis, if needed, to avoid arching through the lower spine. Be aware of any feeling of increased tension through the back of the neck, easing the chin gently down towards the throat.
Take a deep breath in, breathe out slowly relaxing through the belly, hips and both legs, holding the position for several more cycles of breath if possible, releasing if any feeling of strain is experienced behind the knee or into the lower back.
Slide the left foot back in, release the right foot back to the ground and repeat on the other side. Be aware of any difference in the feeling of the two sides of the body…
Day 4 – Cat Arch/Cow Dip
A great way to get the spine moving at the start of the day, or to release some of the tension of your day before bed. Particularly useful in the management of lower back pain.
Benefits
Use this practice to mobilise and encourage blood flow through the entire spine from neck to tail, create space between the vertebrae and improve circulation to the discs in between. The interaction between the opposing movements lengthens, strengthens, releases and creates space in in the front and the back of the body, massaging, stimulating and increasing circulation through the organs in the abdomen. When performed mindfully with the breath, helps to balance the breath, calm the mind and relieve stress.
Awareness
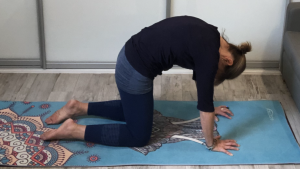
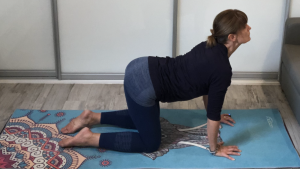
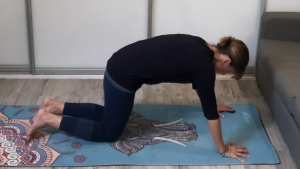
Begin on all fours in ‘table-top’ position with hands under shoulders, elbows gently relaxed, knees under hips, neck long, back of the head raised, chin softly drawn in towards the throat, shoulder blades drawn back over the ribs. Breathe in and out, full calm breath. Take a deep breath in again, breathing out arch up into the back of the body, spreading the back ribs towards the ceiling, allowing the neck to release down – crown and tail towards the ground. Steadily release downwards breathing in, spreading the front ribs towards the ground, relaxing the belly, arching into the back of the body, lifting the head, focusing straight ahead, release the breath to arch back up through the spine. Continue moving steadily between cow and cat, matching movement to inhale/exhale breath. Try to keep an even distribution of weight between hands and knees, keeping shoulders and elbows relaxed to avoid strain in the wrists.
Try pausing to reverse the breath, breathing in on the upward arch and out on the downward dip, notice how this feels in contrast – which direction feels most natural? Trying slowing the breath down, notice how this changes the quality of the movement and the feeling of spread through the ribs front and back.
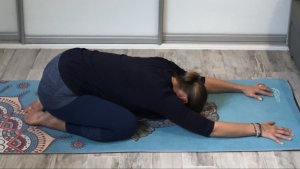
Release back to ‘childs pose’ to rest.
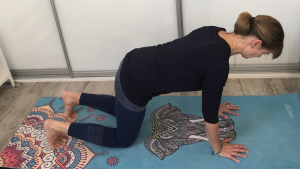
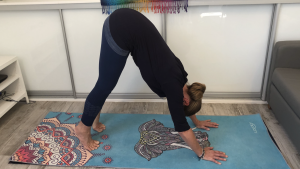
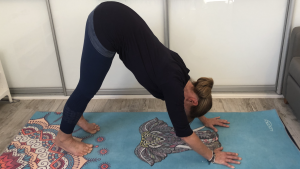
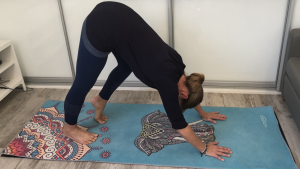
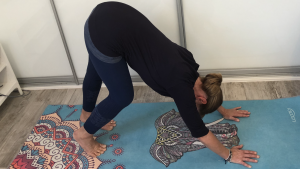
Day 5 – Downward Facing Dog
One of Yoga’s most recognisable postures, downward facing dog takes it’s name from it’s similarity to the way a dog stretches when it gets up. It is often used as a transition/linking posture in flowing sequences such as ‘salute to the sun’. Another spine-releasing posture, it offers a wonderful full-body awakening at the start of the day and great for relieving ‘sitting stress’ at the end of the day.
Benefits
Downward-Facing Dog energises and rejuvenates the entire body. It helps to release tension in the back of the body – from the pelvis, through the legs to the feet, through the spine to the shoulders and arms to the hands and through the neck into the crown. It helps to build strength in the arms, shoulders, and legs. Because the heart is higher than the head in this posture, it is considered a mild inversion and holds all the benefits of inversions: relief from headaches, insomnia, fatigue, and mild depression. The flow of blood to the brain also calms the nervous system, improves memory and concentration, and relieves stress.
Awareness
Begin on all fours in ‘table-top’ position with hands under shoulders, fingers lengthened forward and lightly spread, elbows relaxed – gently rotated inwards, knees under hips, toes tucked under, neck long, back of the head raised, chin softly drawn towards the throat, shoulder blades drawn back over the ribs. Relax the belly – breathe in and out, full calm breath.
Press evenly down through the heels of the hands and the balls of the feet, lift the knees from the ground and slowly lengthen up through the back of the legs, taking the pelvis up towards the ceiling. Relax through the back of the knees, easing the heels towards the ground, keeping the toes pointing forwards. Draw the shoulders back away from the ears to release the neck down, avoid locking through the elbows, spread weight evenly down through hands and feet. Inhale to rise up into the balls of the feet, exhale to lengthen down through the back of the legs, taking the heels towards the ground, without locking the knees.
Try ‘walking the dog’ with alternate heel raises, switching weight from right to left, notice how this changes/develops the experience of release through the back of the legs into the lower spine.
If comfortable in the wrists and shoulders, rest in the posture for a couple of cycles of breath – focus on 2-way lengthening from the pelvis down through the legs into the feet and from the base of the spine through to the crown.
Lower the knees to the ground and release back into child’s pose to rest.

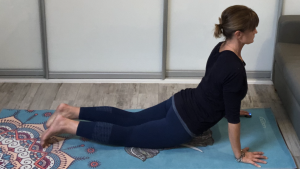
Day 6 – Sphinx – Baby Back Bend
The gentle back bend of Sphinx is a wonderful way to help address issues related to ‘forward slumped’ posture – which is very common in current cultures of sitting for prolonged periods of time, focused on forward facing tasks. Can help to ease lower back pain and stiffness.
Benefits
Sphinx posture helps to lengthen, mobilise and balance the spine, encouraging movement and blood flow through the intervertebral discs, which provide cushioning and support to the spine’s natural curvature. When properly supported through the upper body this posture creates space in the chest, stabilises through the shoulders and promotes length through the neck. It encourages lengthening up through the whole front body, from the tops of the feet, through the front of the thighs to the pelvis and up through the abdomen to the chest and shoulders. The release of the front body is actively supported through the back of the body, strengthening through the legs buttocks and spine.
Awareness
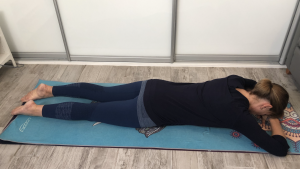
Begin in a front lying position, arms drawn out from the shoulders, elbows bent – one hand on top of the other, supporting the forehead. Gently shift and adjust through the front of the body, resting evenly down through the chest, ribs and pelvis. Lift and lengthen each leg back to rest the front of the legs down into the ground, into the toes – legs hip width apart. Lengthen down through the base of the spine into the tailbone, allowing the pubic bone to softly drop towards the floor, relax the abdominal muscles and release the breath. Notice how the front of the body releases down into the floor, notice how the lower back settles. Repeat the downward focus of the lower spine and release of the abdomen to encourage further settling of the lower back as required. (Place a folded blanket underneath the front of the pelvis, as an option to support the lower back, if required.) Rest is this position to focus the breath deep into the belly, notice how the breath spreads outwards through the side ribs into the back ribs, be aware of the breath moving up through the body as the ribs expand, gently moving the spine.
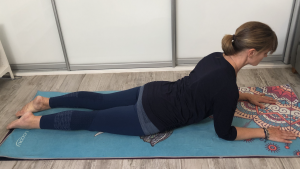
Raise the head up off the hands and bring the arms forward, bringing the elbows under the shoulders to rest into the forearms. Align the wrists with the elbows in front of the body and gently spread into the hands. Press the forearms down through the ground to lift up into the shoulders, drawing the shoulders down, lengthen the neck up through the collarbones, taking the crown up towards the ceiling. Ease the chin softly towards the throat, to create space all around the neck. Relax through the buttocks and belly. Breathe in and out slowly.
Be aware of the front body contact with the ground, gently press through the ground – through the forearms the thighs and the feet and notice how the spine continues to lengthen upwards. Maintain calmness in in the shoulders and continue to focus on full, steady breath.
Release back to ‘childs pose’ to rest.

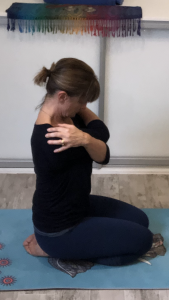
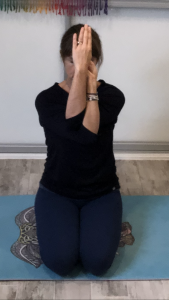
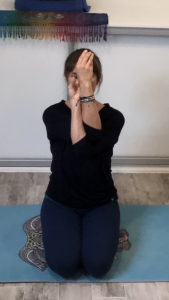
Day 7 – Modified Eagle Pose (Upper Body)
This modified version of Eagle Pose focuses on the upper body, bringing attention to the neck, shoulders, arms, wrists and upper back.
Can be performed from a seated or standing position and offers wonderful relief to tension and strain in the upper spine and neck – a great release at any time of day.
Benefits
Mobilises the upper spine, relieves tension and creates space between the shoulder blades. Encourages length through the neck, shoulders and upper back, through the arms into the wrists. Can be helpful in relief of headaches and migraine.
Awareness
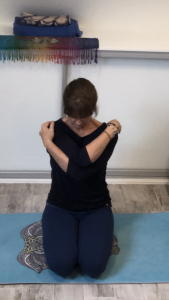
Find a comfortable posture to support the spine in an upright position – kneeling, sitting or standing. Lengthen up through the spine, spreading the arms wide from the shoulders, release the shoulder blades down over the back of the ribs then bring the arms forward. Wrap the arms across the front of the body, right arm over left to hug into the chest – hands cupping the back of the shoulders. Relax the shoulders, resting the elbows down into the chest and allow the head to roll gently forwards. Breathe in and out slowly, focusing the breath into the upper back, relaxing the shoulders and neck. Try to stay in posture for 4-6 cycles of breath, noticing how the breath spreads outwards from the spine into the shoulders, up into the neck and down between the shoulder blades. Deepen the focus of the breath and notice how the body responds…. Raise the head mindfully to return to the upright spine, releasing the arms. Repeat with left arm over right.
Bring the arms forward again, right arm over left, bending at the elbows so that the arms are perpendicular to the floor – backs of the hands facing each other. Move the left hand in towards the chest, to bring the palms to meet (don’t force the movement), lengthening fingers upwards. If lower arm mobility into the wrists feels restricted, maintain the position with backs of the hands facing each other. Relax down through the shoulders, lengthen up into the neck, focus breath movement into the upper back and through the back of the shoulders. Once again try to stay in posture for 4-6 cycles of breath, bringing awareness to the relationship between the movement of the breath and the upper back, arms and neck. Unwind carefully and repeat with left arm over right.
Upon release, thoughtfully move the neck shoulders and arms and notice how the upper body feels, as you breathe.

Day 8 – Rest and Relax
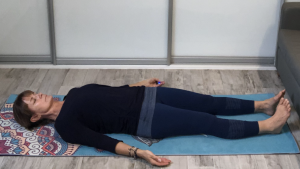
I have always believed relaxation to be a crucial component of a holistic Yoga practice experience, not just because it enables to release tension and strain in the muscles, but because it gives an opportunity for us to open up a deeper, more meaningful line of communication between our bodies, our minds and our breath. Creating a mind-body connection can be incredibly healing and empowering and have a huge impact on our emotional health – time spent learning to develop the art of ‘letting go’, is a worthy investment in ourselves and in the bigger picture of health and well-being.
Benefits
This familiar resting posture encourages the release of tension and strain in the muscles, calms the central nervous system, immune and digestive systems. Calms the mind to help reduce stress and anxiety and helps to improve concentration and memory. Helps to lower blood pressure, reduces fatigue, can offer relief from headaches, improve sleep quality and assist in the management of insomnia.
Awareness
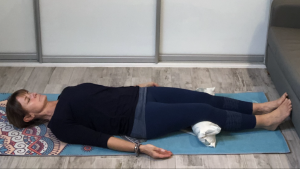
Find somewhere quiet to lie down – somewhere where you wont be disturbed, if possible. Lie with legs straight – using support under the knees if required, legs roughly hip width apart with the arms comfortably out from the sides of the body, palms face up. Shift and adjust through the back of the body, relax through the back of the neck, up into the back of the head and ease the shoulder blades out from the spine and down under the ribs. Relax down through the base of the spine and rest into the back of the pelvis, lengthening down through the back of the legs into the heels. Take a deep breath in, breathing out slowly to relax the whole of the body into the floor – be aware of the support that exists underneath the body and allow the weight of the body to relax into that support. Eyes closed, relax through the face – across the brow, down through the temples, through the jaw, soften the lips – relax through the entire body – through the back and the front – through the right side and the left side – let go of the whole body.
Become aware of the breath, tuning into the rise of the inhalation and fall of the exhalation, allowing the body to respond to the exhalation and it’s sense of release. Continue to breathe in and out slowly and allow the body to deepen it’s imprint into the ground. Be aware of the whole of the body and be aware of the floor, be aware of your body at rest.
The mind is often busy and will wander off – notice where your thoughts go, but try to calmly bring your attention back to the movement of breath – notice the subtle pauses at the top of the inhalation and the bottom of the exhalation, follow the breath through each cycle.
Try to allow 10 minutes for this practice, if possible – set a timer or just allow your body to take the time it needs… Coming back, allow time to return calmly – maybe with a yawn and a stretch or simply bend up the knees to allow the feet to find the ground. Roll over onto one side to sit up, notice how you feel before you return to your day. If using this practice before sleep, take stock of the quality of your subsequent sleep… if practiced regularly, this approach may offer an extremely useful tool in sleep management.
In a structured environment it is feasibly easier to give time to this focus, but so much harder to factor into every day practice. Try using this focus regularly – not just after structured practice, but during the daytime if an opportunity presents itself, or just before bedtime, allowing your mind to offload the overload of unnecessary thoughts, to aid calmer, more restful sleep.

Day 9 – Forward Bend
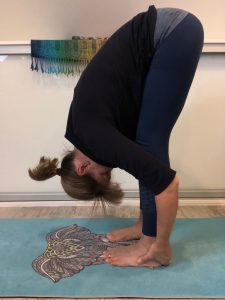
My favourite way to approach forward bend is from the ground up through the legs into the spine – for me this feels like the best way to take charge through the legs and protect the vulnerability of the lower back. This posture brings attention to the whole back of the body – from the undersides of the feet, up through the back of the legs, pelvis, spine and right over the top of the head, through the crown. It is a wonderful spine release and helps to clear the mind – worth practicing daily!
Benefits
This posture releases tension and strain through the whole back body, lengthening through the legs and spine, creating space between the vertebrae, counteracting compression and improving blood flow through the spine to the brain. Increases circulation through the abdomen, gently massaging the abdominal organs. Calms the nervous system, clears the mind, improves balance and strengthens the diaphragm. Helpful in managing blood pressure, stress, anxiety, headaches, insomnia, back pain and knee pain.
Awareness
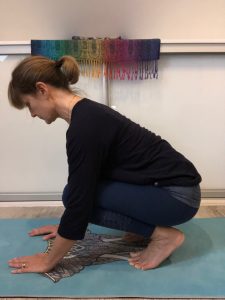
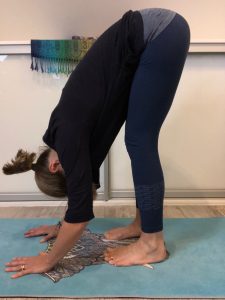
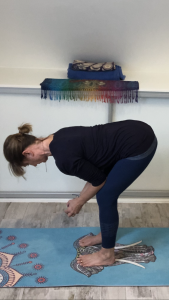
Begin in a squat if possible, feet hip width apart, toes forward, lengthen down through the base of the spine to the tail and up through the back body, through neck to crown. Release the arms forward to take the hands towards the floor. Pressing down through the balls of the feet, slowly open up through the back of the legs, lifting the pelvis to tip the spine forwards and down towards the ground. Keep the knees bent to rest the heels down, hands lightly resting to the ground in front of the feet. Bend the knees more deeply to relieve any feeling of strain on the lower back, legs or knees – *bringing elbows to thighs, as a further option. Spread evenly through the bottoms of the feet and avoid rolling the knees inward. Breathe in slowly allowing the spine to lengthen forward, before releasing down with the out breath.
*USE THIS VARIATION IF YOU HAVE GLAUCOMA, HERNIATED DISC, FEEL LIGHT HEADED OR HAVE UNSTABLE BLOOD PRESSURE ISSUES.
Notice the feeling of tensional pull through the back of the body, adjusting through the back of the knees to reduce any sense of strain. Release the weight of the head towards the ground, letting go of the neck – continue to breathe in and out slowly, allowing the spine to lengthen subtly forwards as the ribs broaden on the inhalation – rest the spine down on the exhalation.
If appropriate bring the hands back towards the ankles, steadily opening up through the back of the legs, keeping the knees subtly relaxed to avoid locking, lifting up into the pelvis, lengthen the spine forward before releasing down. Hold for 4-6 cycles of breath if comfortable, noticing how the ribs expand and fill – offering more length to the spine, focus on letting go through the spine on each exhalation.
Bend the knees deeply, walk the hands forward to lower to hands and knees before releasing back to ‘childs pose’ to rest.


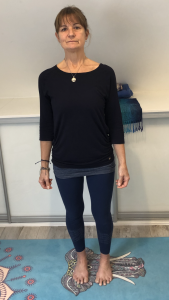
Day 10 – Mountain Pose – Baseline Standing
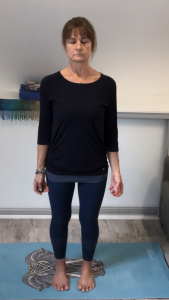
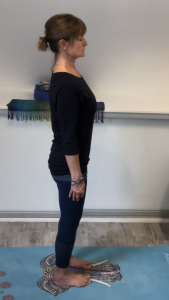
Cultivating our awareness of this baseline posture, brings us back to the spine and allows us to appreciate the relationship between the body and gravity. In an ‘intuitive based’ yoga practice, there is a suggestion that if the spine can calmly lengthen up through gravity in a balanced way and find natural, free movement – the rest of the body will re-arrange itself around that central focus, to return the body to it’s natural tensional balance.
The profoundness of this approach to Mountain Pose has made a huge difference in my own practice and continues to inspire me to challenge what I think I know about my body, allowing my body to give more meaningful feedback and direction.
Practice daily, indoors and out, on different surfaces, in bare feet and in shoes!!
Benefits
Helps to restore the body’s natural alignment, improves posture, balance and body awareness. Gives a sense of grounding, balances strength and support from the feet, ankles and legs to the pelvis and upwards to the rest of the body. Lengthens and creates space in the spine, encourages the release of tension and strain throughout the whole body. Creates space in the chest and abdomen, increasing capacity for breath and relieves strain on the central organs, improving circulation through the abdomen. Encourages focus and calms the mind.
Awareness
Try to do this practice in bare feet if possible…. Stand with feet parallel, hip width apart with toes facing forward. Pick up the toes, spread them wide then relax them back to the ground. Relax gently through the knees. Lengthen up through the spine, drawing the weight of the head up and back subtly to settle on top of the neck, release through the base of the spine to drop the tailbone, relax the belly. Ease the shoulders down away from the ears, relaxing the shoulder blades down over the back of the ribs, letting the arms rest down, palms facing into the sides of the body. Breathe in and out slowly, allowing the body to settle.
With eyes closed (if possible), focus on the distribution of weight through the body – does your weight feel even on both sides? What do you notice about load into your feet – do you have more weight in one foot than the other? Do you feel any heaviness on the inner arches of your feet?
Be aware of any sense of tension or holding, which part of your body are you most aware of – is there one area seeking your attention? Try to remain still, focusing on the breath for 4-6 cycles, tune in to any areas of effort, overload or restriction.
Now allow your weight to move through your feet, move your knees, gently tilt your pelvis back and forth, roll your shoulders and gently move through your neck. Re-settle then inhale to rise and spread through the balls of the feet, allowing the heels to gently lift away from the ground, lengthen up through the spine into the crown. Pause, then exhale to release down through the tailbone, relax down through the legs to rest lightly into the heels.
Breathe in and out slowly, take full deep breaths – which part of your body are you most aware of now – has anything changed? How does your breath feel?
Repeat once again, as you rise up from the heels with the inhalation, think about the spine moving in two different directions from the waist – maintain the focus of lift into the upper spine as you release down through the lower spine, through the legs to lightly lower into the heels.
Pause to breathe. Check back in with your body and notice any further change, particularly in the load into the feet – is weight distribution different? Be aware of how the breath feels, is it moving differently through your body? Which part of your body are you now most aware of?
Try to re-focus the spine’s ‘separation’ a few more times, be aware of how the body adjusts to the focus each time.
At the end of the practice move thoughtfully, especially if you have sensed any hint of resistance to standing still, particularly through the lower back.
Day 11 – Kneeling Lunge
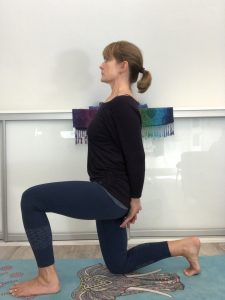
I have always supported the value of lunges within my yoga practice and have found the dynamics of this posture – whether kneeling or standing, to be hugely beneficial in managing integrity of the lower spine. This posture has a strong, supportive quality to its’ focus through the legs, whilst offering a sense of much-needed relief to tension and strain around the lower back and pelvis.
A wonderful posture for relieving the effects of sitting for long periods – definitely worth practicing daily!
Benefits
This version of kneeling lunge posture builds strength and increases flexibility through the legs to the spine, releasing tension and strain in the hips and thighs and through the front of the knees. Strengthens the thighs and buttocks, giving stronger foundation through the base of the spine, to balance and support the upper body. Releases tension through the groin, helping to create space up through the spine and in the abdomen and chest. Brings awareness to the feet, improving balance and stability. Improves circulation through the hips to the legs. Can be helpful in the management of lower back, hip and knee pain.
Awareness
Start from table top with toes tucked under, bring the buttocks back towards the heels, press down through the balls of the feet, lifting up through the spine to kneel, keeping the toes tucked under. Place a folded blanket across the mat, to cushion the knees, if required.
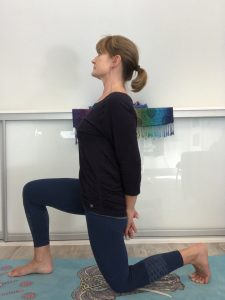
Press down through the right foot to lift up through the left hip, bring the left foot forward, align the heel with the knee, toes forward. Maintain connection through the back foot into the ground, spreading down into the ball of the front foot – be aware of both feet giving support through the legs to the pelvis. Avoid gripping the buttocks.
Press both feet into the ground and inhale to lift up into the spine, spreading through the chest – exhale to relax down through the shoulders bringing the arms back to rest the hands against the sacrum, on the back of the pelvis. Balance and settle the head to the top of the neck, allowing the shoulder blades to relax down over the back of the ribs, drop the tailbone and relax the belly.
Pause to breathe in and out slowly. Notice the focus of pull coming up through the right thigh from the knee to the hip and up into the abdomen. Be aware of any sense of strain in the knee, releasing out of posture if painful.
Hold position for 4-6 deep, full breaths if possible, noticing how sensation changes/settles through the thighs, hips and lower back. Focus on the idea of the spine moving in two directions – allow the breath to take the upper spine upwards as you settle through the lower spine into the legs.
Lengthen forward to put the hands to the ground, take the left leg back, pressing evenly down through both feet to lift back up to kneel. Repeat on the other side, taking the right foot forward.
Notice any difference in the feel of the two sides, does one hip feel much tighter than the other? Is the load on the knee different? Is your sense of balance different? Hold for 4-6 breaths once again.
Take the right leg back, release back to a squat, then lift up through the back of the legs into forward bend for release of the knees. Keep the knees relaxed, release the spine down towards the floor.
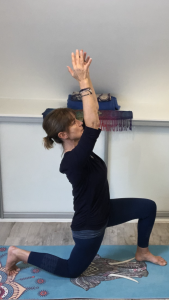
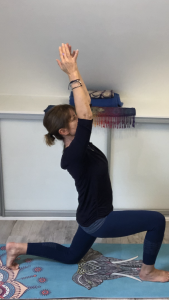
Add variation with the arms coming forward and up, giving more lift through the spine. Be mindful of directing the head back to the spine, relaxing the shoulders and releasing down through the shoulder blades and lower spine. Does this change in arm position make a difference in the hips and lower spine? If the lower back feels overloaded, release the arms back down. Notice any difference in the feel of the two sides.
Release out as before.


Day 12 – Cat Wave
I was introduced to this flowing approach into back bend during my teacher training, and have included it in my practice ever since. Long-term back pain had made me very nervous of deep back bends, but this variation offers a mindful journey into what is essentially a challenging posture, steadily mobilising the spine with the support of focused breath. I call it ‘Cat Wave’ as it feels like a wave of movement, flowing through the spine – with cat arch as preparation and release.
Good to practice daily, offers a wonderful morning wake-up/end of day release for the spine and the breath.
Benefits
Mobilises, energises, lengthens, strengthens and helps to realign the spine, improves circulation and creates space between the vertebrae. Balances strength and flexibility between back and front of the body, strengthens shoulders, arms and wrists. Creates space in the abdomen and stimulates abdominal organs, improving digestion. Stimulates the nervous system, awakening energy and breath flow through the body, helpful in managing fatigue, anxiety, stress, respiratory problems, insomnia and back pain.
Awareness
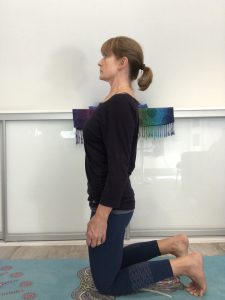
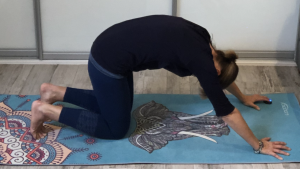
Kneel with toes tucked under, feet and knees hip width apart, buttocks drawn back towards the heels. Reach the arms forward to full stretch, a little wider than shoulder width apart – this creates the pathway between the feet and the hands.
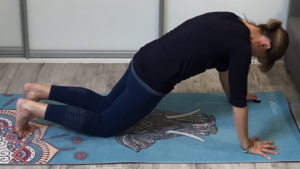
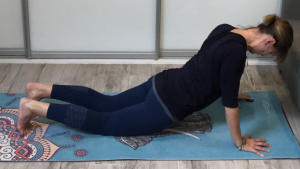
Inhale to round up through the back of the ribs, ‘cat arching’ the spine, slowly moving forwards towards the hands, exhale slowly, release the front of the thighs down towards the floor, opening upwards through the belly, ribs and chest. Inhale pressing down through the hands, rise up through the arms into the shoulders, lengthening up through the neck to the crown, – pause to exhale, allowing the belly to relax and the shoulder blades to release down over the back of the ribs.
Inhale to round up through the back of the ribs once again, ‘cat-arching’ through the spine, slowly moving back towards the feet, exhale slowly, bringing the buttocks back towards the heels.
Continue moving back and forth between the feet and hands with the breath, keep the toes tucked under throughout if possible – pressing through the feet and hands to lift up through the spine. Keep the elbows focused back towards the ribs and avoid locking. Aim for 4-6 journeys.
Maintain awareness of the load through the wrists and lower back, do not continue if pain is experienced in either area. Avoid gripping through the belly, let the breath move freely through the abdomen and ribs.
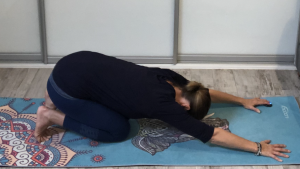
Release back to Child’s Pose to rest.


Day 13 – Supine Pigeon
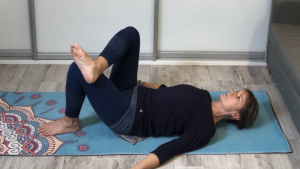
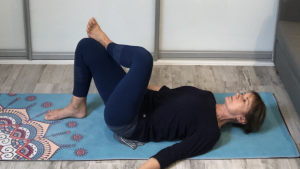
This laying variation of the Pigeon Pose is a gentler appreciation of the traditional upright, seated version. With the spine relaxed and supported on the ground, it brings awareness to the balance of load through the pelvis – directing attention more gently and thoughtfully out through the hip joint into the leg. This variation is a calmer approach for anyone with lower back pain or as preparation for the full pigeon and other seated postures.
I regularly include this hip release as part of a back laying sequence that I use for ‘sitting relief’ – especially when my lower back and hips feel stiff from too many hours spent working on my laptop!
Benefits
Releases tension from the lower spine, through the outer hip down the leg into the ankle. Improves range of movement in outward rotation from the hip, relieving tension in the groin. Improves circulation through the lower back, hips and lower body. Helpful in the management of lower back pain, sciatica and ‘iliotibial band syndrome’.
Awareness
Lay on your back with your knees bent, feet resting on the ground, hip width apart, toes facing forward. Settle the back body into the ground, easing back and forth through a gentle pelvic tilt to rest evenly into the back of the pelvis – lower back light, relax the belly. Inhale and exhale slowly, relaxing the back of the body into the ground.
Lift the right leg to cross the ankle over the left thigh – just above the knee, allow the right upper thighbone to rotate out from the hip. Try to keep the pelvis evenly back into the ground, to avoid twisting the spine. Keep the ankle gently flexed, heel to the outside of the thigh.
Notice the feeling of pull through the outer hip, gently guiding the knee away to deepen, if appropriate. Be aware of any adjustment this creates in the position of the pelvis, try to keep weight even in both sides. Inhale and exhale slowly to settle and stay for 4-6 cycles of breath. Is there any change in sensation? Is your awareness focused to your hip or does it travel to your outer knee and ankle?
Don’t be concerned if there is not a lot of sensation, this is a reasonably calm focus to the hip, although it can feel quite deep when the lower spine is vulnerable or if there are degenerative problems within the hip joint.
Lift the ankle and extend through the back of the leg to release, return the foot to the floor, re-balance and settle into the back of the pelvis.
Lift the left leg to repeat on the other side.
Notice the difference in the feel of the two sides – does one hip feel much tighter than the other? Try to take full, deep breaths and notice if there is any feeling of response from the hip as you exhale.
Bring both knees into the belly then lengthen each leg down into the ground to release through both hips.


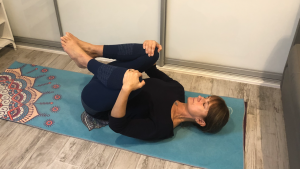

Day 14 – Reclined Cobbler’s Pose
Reclined Cobbler is a classic restorative posture – a wonderfully open and relaxing posture, which invites breath and calmness into the whole body. There are many variations on this theme with different ways to support the body to relax and enjoy resting in this pose – it is certainly time well spent for body and mind.
This variation is a basic approach and a good starting point – a great end of day release for the hips and lower spine. I often combine this posture with a back lying twist to ease out of my day and create a sense of balance in the lower spine
Benefits
This posture releases tension and strain throughout the body, with a strong focus on creating space in the chest, shoulders and down through the inner arms – through the abdomen into the hips and down through the groin and inner thighs to the legs. Improves general circulation through the body and blood flow through the pelvis. Relaxes the muscles of the abdomen, relieving strain on the abdominal organs, easing digestive stress. Calms the nervous system, relaxes and deepens the breath, helps to ease symptoms of stress, anxiety, mild depression and insomnia. Can be helpful in managing lower back pain.
Awareness
Lie on your back with your knees bent, settle through the upper back and shoulders, neck long, head resting centrally at the top of the spine, arms spread out from the sides of the body, resting into the floor, palms face-up. Move gently through the lower spine, tilting the pelvis back and forth to settle into the back of the pelvis, belly soft, relax into the back of the body.
Bring the feet together, rolling the upper thigh bones outwards, lowering the knees towards the floor, bringing the bottoms of the feet to meet, releasing out through the groins. Rock a little from side to side before resting the back of the pelvis into the ground – sliding the feet a little further forwards if there is any sense of strain on the lower back. Inhale slowly and deeply, exhaling to release down through the front of the body – from the chest, through the ribs, to the belly and out through the hips into the legs. Relax the buttocks.
Notice how the openness through the hips reflects back up through to the lower spine, adjusting position or bringing the knees slowly back up if there is any sense of distress in the lower back.
Place cushions/support underneath the thighs to reduce the pull through the groin and lower back, if required – this will make it more comfortable to stay in the posture.
Rest back into the ground, focusing on opening the breath wider into the centre of the body, expanding deep down into the belly to rise up underneath the navel – notice how the body responds to fuller, deeper breath, particularly through the groin and hips. Each exhalation breath encourages a sense of ‘letting go’ through the whole front of the body – invite the breath into the openness, allowing the back of the body to rest back into the floor.
Press down into the feet to support and return the legs to the upright position, coming out of position can sometimes bring a sense of challenge to the groin, so the feet will help to support up into the spine.
Hug the knees into the belly to release.

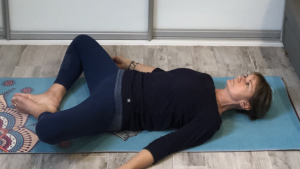

Day 15 – Box Breath
Most of us breathe inefficiently and being human, we forget about the wonder of the breath. We take it for granted and it may often take a health crisis or bad air quality for us to appreciate this basic, yet profound ability. Mindful breath work can achieve tremendous health benefits and proper breathing is an important part of learning how to calm the mind and body. This breath practice is a very simple stress management exercise, pacing the breath to a set rhythm, which helps to balance the breath and reduce stress.
Practice box breathing for only a minute or two and experience the immediate benefits of a calm body and a more relaxed mind, or practice for several minutes and experience the longer-term benefits of this simple practice.
Box Breath can be practiced virtually anywhere and anytime – showering, watching TV, sitting at a desk whilst working, or lying down in bed. Different postural positions will bring different experiences to the practice, so experiment a little to find what works best for you.
Benefits
Improves respiration, increasing absorption of oxygen. Calms the nervous system, reduces stress levels in the body, lowers heart rate and balances blood pressure. Can help to improve management of chronic pain and regulation of the body’s reaction to stress and fatigue. Reduces levels of anxiety and depression and helps to improve quality of sleep.
Awareness
CAUTION
Breath practices should not feel stressful or create any sense of anxiety, so if this practice causes any level of difficulty or stress in finding breath, halt the practice and allow your breath to return to it’s own natural rhythm.
Find a comfortable position to settle into, one which allows the body to potentially feel calm and supported, to allow breath to move freely.
Bring your attention to the movement of your breath, be aware of the inhalation and the exhalation and of your breath’s natural rhythm.
How to do Box Breathing
- Gently inhale through the nose to a slow count of 4.
- Hold at the top of the breath for a count of 4.
- Then gently exhale through the mouth for a count of 4.
- At the bottom of the breath, pause and hold for the count of 4.
- Inhale to start again.
Try to complete 4-6 rounds if possible, then relax to allow the breath to find it’s own rhythm again, notice how the breath feels in comparison to when you began the practice.
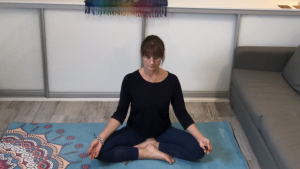
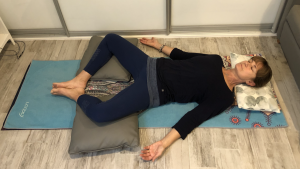

Day 16 – Upright Spine Awakening
I use the following movements a lot in my practice, sometimes simply as a morning wake-up for the spine, when I have been sitting for a long period of time or as active release from more focused practice. Moving the spine will feel good at any time of day, to wake up, to release or to ease out of the day before bed.
Benefits
Relieves stiffness in every-day posture. Lengthens, mobilises, creates space and encourages balance of movement through the spine. Creates space in the centre of the body, opens through the abdomen, improving circulation through the central organs. Release tension through the spine, reducing load on the lower back. Opens up through the ribs and underarms, releasing out through the shoulders and arms. Warms the body, increases blood flow, gently elevates the heart rate and encourages movement of breath.
Awareness
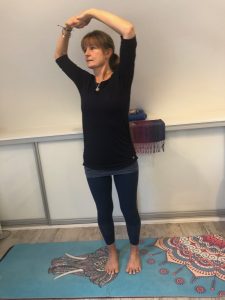
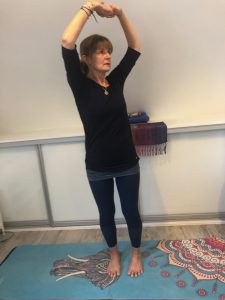
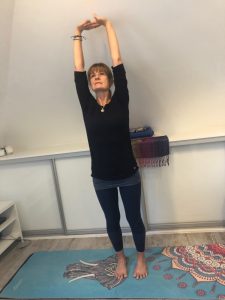
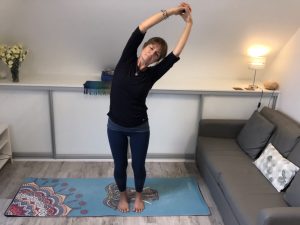
Stand with feet hip width apart, toes facing forward, relaxed knees. Bring the arms forward to lace the fingers, turn through the wrists to press away through the palms, lengthening out through the arms without locking the elbows. Raise the arms to shoulder height, slowly twisting from side to side, steadily extend upwards to stretch overhead. Settle the weight of the head up onto the top of the spine stack. Inhale to extend up centrally through the spine and up through the arms, pressing the palms towards the ceiling. Exhale, releasing down through the shoulders and through the lower spine – dropping the tailbone, relax the belly. Inhale deeply then exhale to release the arms back down.
Repeat a second time, holding the upward stretch for an extra cycle of breath. Notice any areas of tension – any resistance to the upward stretch, particularly through the lower spine. How far through your body does the focus of the upward stretch travel – does it extend up from abdomen or lower – from the pelvis and legs? Is there a feeling of tension in the neck? Do the arms feel restricted?
Release the arms down, move the shoulders and neck, inquire into the experience…..
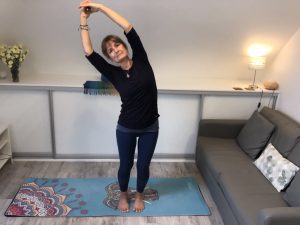
Reach the arms out to the sides of the body, steadily rising to clasp the back of the right wrist with the left hand. Inhale to extend up through the spine, exhale to lengthen through the right side of the body, side bending to the left, releasing the shoulders down. Inhale to return to centre, exhale to release the arms down.
Stand still – be aware of the two sides of the body, does the focused side feel different? If so, how?
Repeat on the other side, taking hold of the left wrist with the right hand.
Stand still to check in again, do the two sides now feel balanced or is there still a difference?
Repeat through both sides again, hold for an extra breath if appropriate to extend a little further into the side bend. Notice how the body feels now – how does the breath feel?
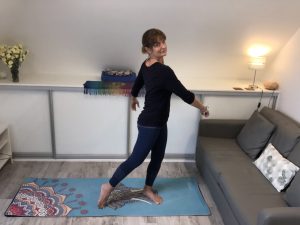
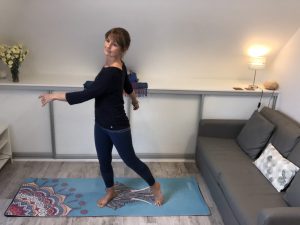
Standing spiral to release through both sides of the body – extend up through the spine, allow the arms to swing and wrap around the body. Relax out from the shoulders, down through the arms to allow momentum into the movement. Shift weight through the legs to allow the spiral to travel up from the feet. Let the breath move freely and calmly through the movement. Notice how the upper body feels as a result of the release out from the shoulders – standing still for one or two focused breaths to allow the body to settle.
CAUTION
The spiral will usually find it’s way naturally up and out through the neck, if any dizziness is experienced, focus straight ahead to keep the neck still, holding a focused gaze straight ahead in front.

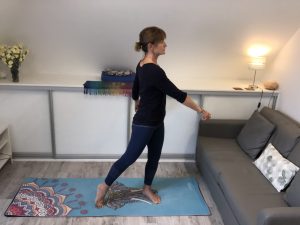
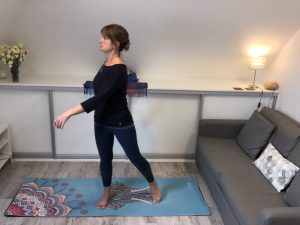
Day 17 – Warrior Lunge
Any regulars to my classes will have intimate knowledge of this Warrior Lunge variation and potentially appreciate the value of this strong, leg-focused posture. With so much time spent sitting in western cultures, the need to find relief from the forward and downward pull of the spine into the pelvis becomes increasingly more important, and this posture can pay an important role in a balanced approach to that cause.
On an emotional level, focusing on the strong sense of grounding experienced from getting in touch with the feet and the legs and feeling connected to the earth is hugely beneficial to our emotional health and well-being – a useful tool to draw on in current times!
I do these lunges on and off my mat – in my structured practice and and sometimes whilst waiting for the kettle to boil – they are a great way to relieve tension and tiredness in the lower back and stiffness in the hips.
Benefits
This lunge posture builds strength and increases flexibility through the feet, ankles, legs and spine, releases tension and strain in the hips, thighs and through the front of the knees. Strengthens the thighs and buttocks, giving stronger foundation through the base of the spine, improving balance and support to the upper body. Releases tension through the groin, creates space up through the spine, in the abdomen and chest. Brings awareness to the feet, improving focus, balance and stability. Increases circulation through the hips to the legs. Can be helpful in the management of lower back, hip and knee pain.
Extending the arms upwards strengthens through the shoulder girdle, increases the space in the spine and abdomen, opening up through the ribs and shoulders and all the way through the arms into the fingers. Improves circulation and blood flow through the upper body.
Awareness
Start with the feet hip width apart, toes facing forward, spine long, arms to the sides of the body. Take a step back with the right leg, resting into the ball of the foot, heel raised from the ground, knee relaxed. Front knee bent, aligned with the heel, weight spread evenly through the ball of the foot, lightly resting into the heel. Lengthen up into the spine, easing the arms back to rest one hand against the other, centrally into the back of the pelvis onto the sacrum. Relax through the lower spine, drop the tailbone, relax the belly.
Gently press both feet into the ground, inhaling to lengthen up through the spine, bringing the head to settle on top of the spine stack – exhale to relax through the shoulders, settling into the legs. Notice the feeling of pull through the right thigh, adjust and reduce tension by bending the back knee a little more, if required. Be aware of the lower spine – try to keep the tailbone pointing down and the belly relaxed to maintain a sense of calmness, balance and support through the pelvis. Avoid gripping the buttocks. Release the arms, press down into the ball of the back foot, lightly springing forward to release through the legs.
Repeat, taking the left leg back. Notice any difference on this side – is this side more stable? Is the feeling of pull through the hip to the knee or from the hip into the lower spine different?
From the starting position take the right leg back a second time, settling through the legs into the feet. Bring the arms forward and up to shoulder height, draw the arms back into the shoulders then rise up towards the ceiling. Inhale extending up through the spine – from the belly through the ribs to the chest and up through the arms into the fingers. Exhale to relax the shoulders, release down through the tailbone to settle through the legs. Be aware of the whole body, from the feeling of connectivity through the ground, all the way up through the spine, through the arms into the fingertips. Notice the difference in feel to the first variation, particularly through the hips into the lower back. Inhale then gently press down into the ball of the back foot, exhale – lightly spring forward releasing the arms at the same time.
Repeat taking the left leg back, once again noticing any differences in this side.
Come to Mountain Pose to pause and breathe. Be aware of feet, legs, and breath – is your heart rate gently elevated? Has your breath changed? Do your legs feel more lively? Does your body feel warmer?
This dynamic posture offers a wonderful wake-up to the whole body, repeat through both sides if appropriate or try staying in posture for longer – your legs, spine and upper body will benefit hugely from the attention!

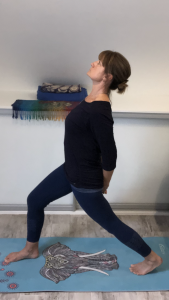
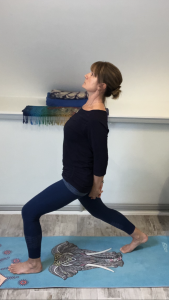
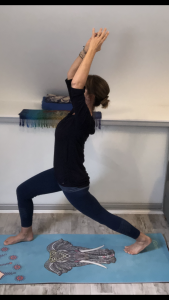
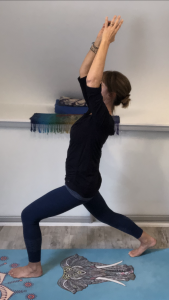

Day 18 – Wide Forward Bend
All forward bend variations bring focus to the musculature of the entire back surface of the body – from the soles of the feet, to the muscles up through the backs of the calves and thighs, to the back of the hips, through the muscles and connective tissue at the back of the torso, up through the spine to the head. When varying the stance, we add a new focus from the feet through the legs into the hips and spine and in wide forward bend, the extra focus is directed upwards from the inner arches of the feet, through the ankles to the inner thigh track up into the groin.
Benefits
This posture eases tension and strain through the whole back body, lengthening through the legs and spine, creating space between the vertebrae, easing disc compression and improving blood flow through the spine to the brain. Releases tension through the groin, inner thighs and through the outer ankles – balancing strength and support through the arches of the feet. Increases circulation through the abdomen, gently massaging the abdominal organs. Calms the nervous system, clears the mind, improves balance and strengthens the diaphragm. Helpful in managing blood pressure, stress, anxiety, headaches, insomnia, back pain and knee pain.
Awareness
Stand in wide stance with feet parallel, relax the knees a little to balance through the ankles. Broaden through the tops of the feet, lift the toes to spread the balls of the feet into the ground and lift up through the inner arches, rooting down through the outer edges from the little toe to the outer heel. Spread through the chest, ease back through the shoulders to bring the arms to the back of the body, resting the backs of the hands onto the sacrum.
Inhale to draw up through the spine, opening the chest – exhale lengthening forward, draw out through the neck into the crown, keeping the spine long and the knees relaxed. Pause halfway towards the floor, allowing the arms to release down from the shoulders, finger tips to the ground. * Remain at the half way mark as an option. Reaffirm the spread through the feet, gently focusing up and out through knees and thighs into the groin. Inhale to lengthen the spine forward, drawing out through the chest and front ribs, exhale to release the spine down, tipping the top of the head towards the ground.
*USE THIS OPTION IF YOU HAVE GLAUCOMA, HERNIATED DISC, FEEL LIGHT HEADED OR HAVE UNSTABLE BLOOD PRESSURE ISSUES.
Notice the focus of effort from the feet up through the ankles to the knees – try lifting the toes to broaden through the balls of the feet to prevent inner arch collapse – relax the knees a little to ease tension through the lower back and through the back of the legs – spread the upper thighs outwards to open up into the groin. Notice how minor adjustments through the base in the feet and ankles relate back up through the body – through the legs into the spine.
Inhale deeply, feel the breath opening and spreading through the ribs, lengthen the spine forward, exhale to release down. Hold in posture for 4-6 breaths if appropriate.
Spread the feet into the ground and bend the knees a little more to prepare to return. Return the hands to the back of the pelvis, pull down through the base of the spine, through the legs into the feet, ease the spine back steadily from its’ base, stacking upwards – head up last.
Bring the feet back in under the hips to release.
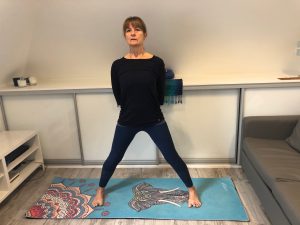
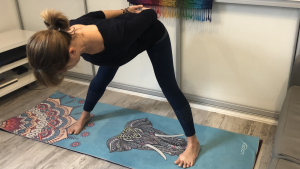
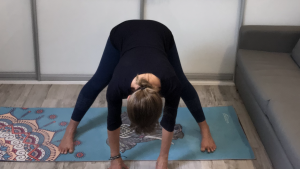
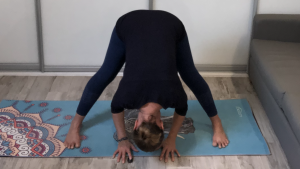

Day 19 – Staggered Half Forward Bend
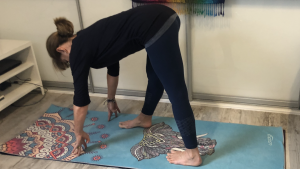
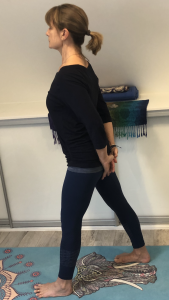
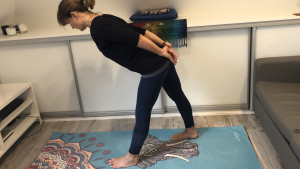
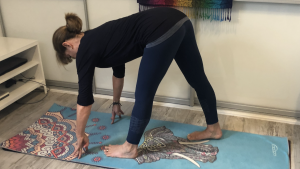
This variation of ‘Intense Side Stretch Pose’ is a unilateral forward bend which brings focused attention and awareness to the two sides of the body individually. Stability and balance are more deeply challenged through this posture than in other forward bends, but in my experience this added focus offers great value to practices which seek to awaken the legs to re-balance strength and support to the spine.
Benefits
Alongside the usual benefits of the bi-lateral forward bends already highlighted, this posture offers an added dimension to the exploration of tension relief through the back of the body. Focused attention is given to each side of the body separately, giving an opportunity to compare and assess balance and alignment through each leg into the back of the pelvis and up into the spine. Further benefits include increased strengthening of legs, ankles and feet, with opportunity to further develop and improve balance and postural awareness.
Awareness
Start with the feet hip width apart, take a natural stride step forward with the right foot, both sets of toes facing forwards. Lengthen up into the spine, easing the arms back to rest one hand against the other, centrally into the back of the pelvis onto the sacrum. Balance weight load through the legs, relax the knees, spreading evenly down through both feet. Release through the lower spine, drop the tailbone, relax the belly.
Inhale lift up through the spine from base to crown, exhale to lengthen forward, drawing out through the front ribs, spine long, chin drawn softly in towards the throat. Keeping knees gently relaxed, pause at the halfway point to release the arms down from the shoulders, fingertips to the floor. Notice the tensional pull on the back of the legs and sensation through the lower spine – relax a little more through the knees or bring the back foot further forward, to adjust intensity.
Inhale to lift the spine a little, exhale to lengthen forward, aim to settle the spine as close to parallel to the floor as possible.
*Option – if it isn’t possible to touch the floor, support the hands on blocks or on the seat of a chair, to reduce the load back through the spine to the legs.
Notice how the movement of the spine reflects back down through the legs – be aware of the balance through the back of the pelvis. Move subtly through the feet and legs if the pelvis feels tilted or twisted – adjust through the knees to seek out balance up through the back of the legs to hips. Stay in posture for 2-4 breaths, if appropriate.
Step the back foot forward into forward bend, bend the knees, draw down through the tailbone, into the legs, press the feet down into the ground to support the spine back up from it’s base, stacking steadily upwards to stand.
Pause to breathe in and out, notice how the legs feel…. what do you notice about the two sides of the body?
Step forward with the left leg to repeat on the other side.
Be aware of any difference in feel on this side – is there stronger pull through the left side of the body? Are the same adjustments needed to balance out the pelvis? Does the support through the legs feel different?
Once back up to stand, check back in again to assess balance through the two sides of the body.
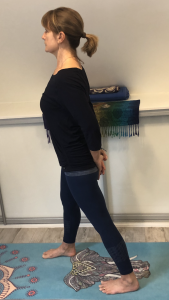
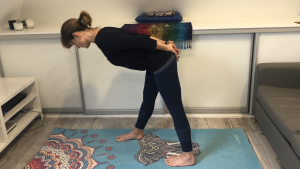



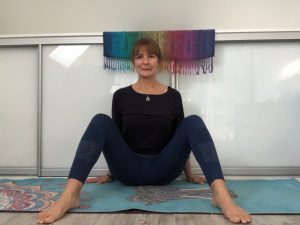
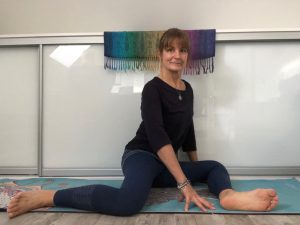
Day 20 – Right Angled Knees/Swastika
Sitting for long periods of time has become one of our greatest postural challenges and with lower back pain issues on the increase, many of the sitting practices I now share, are intended to offer management tools to address ongoing difficulties. I regularly use this focus as preparation for seated postures that bring attention to the relationship between the lower spine and the outer hip pathway, which extends down through the knee to the ankle. Hip impingement hugely affects the integrity of the lower spine and when the lower spine is overly compressed, this pathway may carry nerve pain through the entire leg – sometimes as a result of impingement on the sciatic nerve. This focus offers a route to prepare for seated posture practices which challenge the hips and can be a valid tool in the long term management of lower back issues.
Benefits
Eases tension and strain through the lower spine, alleviating pressure on the discs of the lumbar spine. Focuses down into the pelvis and the hips from the lower spine, offering a multi-muscle hip release through both sides of the body – buttocks, groin, and thighs. Brings attention to deep-seated impingement within the hips, offering relief to sciatica and associated knee/ankle pain. Creates space in the spine, improving circulation and promoting blood flow through the pelvis to the legs and feet.
Awareness
Sit with legs in front of the body, knees bent, feet on the ground – a little wider than hip width apart, hands to the ground behind the back. Roll the legs from side to side, releasing the knees down towards the ground, weight shifting through inner and outer edges of the feet.
Roll the knees towards the right side, allowing the legs to settle into the ground – bringing both knees into a right-angled position – resting into the outer hip/knee/ankle on the right side, inner thigh/knee/ankle on the left. Press the hands down into the ground to lift the right hip, drawing outwards from the pelvis. Settle the hip into the ground, lining up the hip with the knee.
Relax the belly then inhale to lengthen up into the spine, turning through the ribs to align with the pelvis, centering the upper body, hands resting into the ground either side of the front leg. Gently flex both ankles before relaxing down through the legs into the feet – front and back.
Bring attention to the front hip and the track down through the outer thigh to the knee – does the knee relax easily to the floor? (Support can be used underneath the outer knee to ease any feeling of strain from the outer hip into the knee.) Leaning slightly forward lengthen up through the spine – does this change the focus back down though the hip? Breathe deeply into the belly – does the focus of breath offer any sense of relief through the hips?
If the lower back starts to tighten, release back to centre – otherwise hold in posture for 4-6 breaths – allow the spine to continue to gently lengthen upwards with the breath – notice if/how sensation changes.
Easing out of position, return to the start position to rest back into the hands, rolling the legs from side to side once again. Allow the legs to move to the left side to repeat on the other side.
The two sides of the body will often have very different experiences in this posture – be aware of what you notice in the hips on each side, notice how far sensation travels down the leg….
Upon return to centre from the left side focus, lay back into the floor hugging the knees into the belly to release.
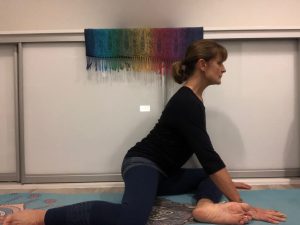

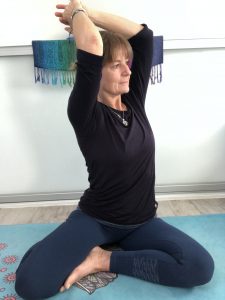
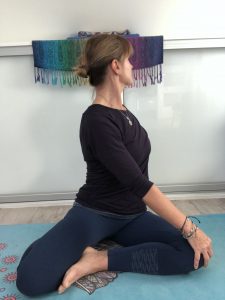
Day 21 – Seated Twist
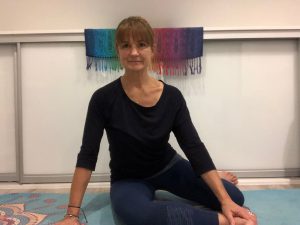
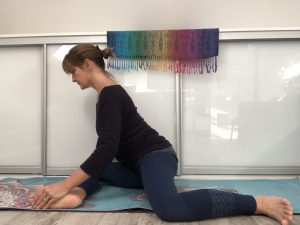
This variation of Sage Pose is a wonderful twist, which highlights a journey of movement all the way up through the body from the feet to the top of the spine. Focusing the breath in this posture brings awareness to the spine’s natural movement upwards from its’ base, inviting expansion through the ribs – creating a sense of open space all around the centre of the body. Another opportunity to investigate movement through the two sides of the body individually – this focus brings awareness to the shoulders and hips and helps to find balance through the spine.
The Right Angled Knees preparation covered previously helps to set this posture up, preparing the feet, legs and hips to support the twist all the way up through the spine.
Benefits
Balances, mobilises and creates space in the spine, increases circulation, boosts the parasympathetic nervous system (rest and digest response). Increases strength and flexibility of musculature that supports the twist action of the spine. Mobilises the hips, relieving tension and strain through the lower spine – helpful in back pain management. Creates space in the abdomen and massages abdominal organs – aiding and improving digestion. Mobilises the shoulders and neck, relieving tension in the chest and upper back. Eases strain through the ankles and knees, strengthens arches of the feet. Encourages calm, full breath, helps to relieve stress and anxiety.
Awareness
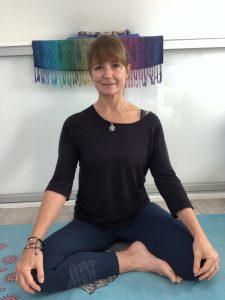
Sit with the legs in front of the body, cross the right leg in front, resting into the outer thigh, calf and ankle. Release back through the left leg, resting into the inner thigh, inner calf onto the front of the ankle – all 5 x toenails into the ground. (Roll the calf outwards to help release down into the shin. Upper thigh bones evenly angled out in front of the body, bottom of the right foot resting against the left inner thigh, just above the knee. Aim to rest down as evenly as possible through the buttocks, using a block or cushion under the right buttock to level off, if required. Check for strain in the knees and ankles – try extra lift support to reduce tensional pull and relieve cramp in the arches of the back foot. Inhale slowly, exhale to settle through the base.
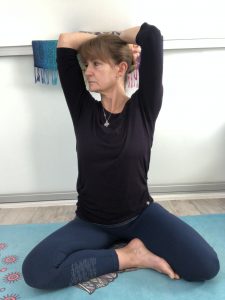
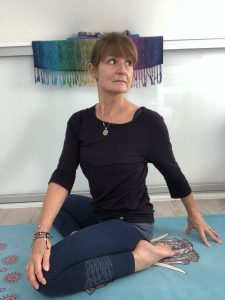
Raise the arms up away from the ribs, lengthen up into the spine with the inhale breath, twist to the right with the exhale breath. Inhale again and repeat, easing a little deeper into the twist if possible. Relax down through the shoulders and arms, resting the left hand on the right knee, right hand to the floor behind the right hip. Relax the belly. Gently lengthen up through the upper spine, allowing the twist to travel a little deeper into the neck, turning through the neck to look back over the right shoulder.
Settle through the pelvis into the legs, focusing the breath into the abdomen. Allow the breath to spread through the belly, up through the ribs into the chest – notice how the fullness of the breath moves through the spine to release down through the base and lift up and out through the upper body. Notice any change in space through the chest or response through the shoulders and neck.
Aim to rest in posture for 4-6 breaths, before lifting up through the spine to release steadily back through the twist – from the neck, out through chest and shoulders and back through the abdomen to face forward.
Carefully release the back leg forward, then release the front left, move the legs and gently mobilise the ankles before switching sides.
Once again there will often be a very different experience of the posture in the two sides of the body – notice the variance and investigate where the challenges are being experienced. Tension in the ankles and knees will affect ability to find balance in the base, as much as tension through the lower spine and hips. Do not assume that both sides will need the same level of support – check each side independently and respond to need.
I like to do Downward Face Dog or Forward Bend after this posture, this helps to balance back through the legs and release the knees.

Day 22 – Legs Up The Wall
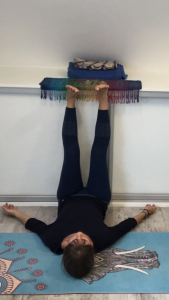
Adding to our list of calming practices, this is one of my favourite resting postures. Legs Up The Wall is a wonderful restorative pose, which calms the body and mind. It is a rejuvenating, inverted pose that brings relief to the legs, spine and nervous system and is a gentle way to bring the body into a deep state of relaxation and renewal. Regularly integrating this practice into your week can be an easy way to relax and restore body, mind, and spirit. It can feel great after a long day, after travelling, or after spending a lot of time sitting or standing. Try doing this pose for five minutes on the days when you don’t feel like doing a full yoga practice — you may be amazed at the rejuvenating power of this simple pose!
Benefits
Eases tension and strain through the whole body, calms the nervous system, regulates breath flow and calms the mind. Lengthens the back of the body, focusing release through the lower spine into the legs, helpful in management of lower back pain and offers relief to ‘restless legs syndrome’. Improves circulation through gravity-assisted promotion of blood flow, down through the legs back to the heart. Assists drainage of excess fluid built up in the feet, ankles and legs, reducing pain and swelling in the lower extremities. Focused breath in this posture is helpful in management of anxiety, stress and insomnia. Also good for varicose veins, headaches, high and low blood pressure, digestive problems, menstrual cramps and muscle fatigue.
Awareness
Sit sideways onto the wall, lean back, turn and swing your legs up into the wall, hip width apart. Rest down through the upper body, legs should feel relaxed rather than under stretch – adjust position, shuffling in closer towards the wall or use feet to push further away as required to settle comfortably into the back of the pelvis. Flex through the ankles to lengthen up centrally into the back of the heels, soften the knees and relax the shins.
Adjust through the upper body to settle into the back of the ribs, spreading arms out to the sides of the body with palms face up, rest the back of the head into the ground, gentle space under the chin. Relax the belly, inhale and exhale slowly to release the weight of the body into the ground.
Scan down through the body to check for any sense of tension and strain – be prepared to use support if there is any struggle to get comfortable. A folded blanket under the pelvis will reduce some of the pull through the lower spine and provide some cushioning for the back of the pelvis, if the floor feels hard. Use a light pillow to support through the neck if required (avoid tightening the throat).
It may take a little while to get comfortable, but once settled relax back into the floor, close your eyes and bring attention to the breath. Allow the breath to steadily slow and deepen – stay in posture for 5 to 20 minutes breathing consciously throughout, notice how your body responds. If you are not used to restorative postures, you may want to get up after 5 minutes, and that’s fine. Over time, with practice you will be able to stay longer.
When you are ready to come out of the pose, bend your knees toward your chest. Roll onto your right side and rest there for several breaths. Then, press your hands into the floor and walk yourself up to sitting, letting your head come up last. Sit quietly with your back against the wall for a few minutes and feel the effects of the practice.
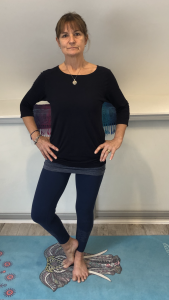
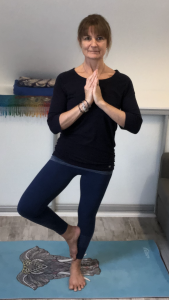
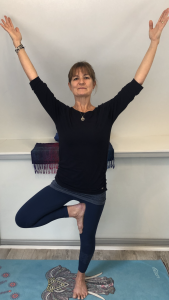
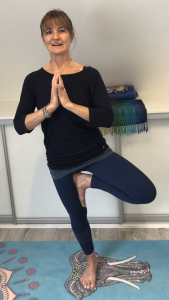
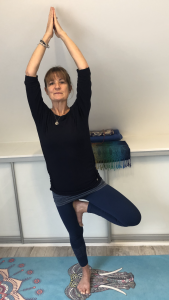
Day 23 – Tree Pose
Trying to find balance and stability whilst standing on one leg can be a frustrating experience and I am sure that many of us would happily exclude balance postures from personal practice altogether. There is a lot of value in bringing attention into the two sides of the body individually, particularly in postures which challenge balance and I have found that Tree Pose can be a much more comfortable focus, if more attention is given to the natural instincts of the spine.
Through my practice I have come to appreciate that the spine aspires to the same sense of connectivity that trees have with the earth and the sky – we root down through the lower spine and legs into our feet to find the ground like the trunk of a tree into its’ roots – then through the upper spine we reach up through the crown towards the sky – like the branches of a tree reaching up towards the sun. If we keep this basic awareness in mind, it changes how we approach our practice and the challenges we face in finding our roots to balance are given a new perspective.
Benefits
Brings awareness to the spine, improves posture, balance and stability. Strengthens feet, ankles, legs and hips and eases tension and strain in the hips, groin and lower spine. Creates space in the abdomen, ribs and chest, encouraging free movement of breath. Improves focus and concentration, calms the nervous system, settles the mind.
Awareness
Stand with the feet under the hips, lift and spread then relax the toes, lighten the heels, spreading evenly into the balls of the feet, knees soft. Relax the belly, inhale to lengthen up through the spine, exhale to release down through the tailbone, release the shoulders – relaxing the shoulder blades down over the back of the ribs, arms rest to the sides of the body. Inhale and exhale to allow the body to settle.
Shift the weight subtly into the left leg, keeping the heel light and the knee soft, spine lifted. Rotate out through the right hip – slide the right heel in to rest against the left outer ankle bone, toes resting into the ground, relax the buttocks. Bring the hands to the front hip bones, check for balance in the pelvis, then reach the arms up and out to the sides to direct the spine up and away from the pelvis – lengthening through the abdomen. Inhale deeply to expand and lift through the ribs, lengthening up into the crown, exhale to settle the arms – keep them lifted or bring to the centre of the chest in prayer position.
Think about the spine moving in two directions – from waist level the upper spine travelling upwards towards the sky – the lower spine releasing down from the pelvis, through the standing leg and the ankle to root the foot into the ground. This visual will help to lighten the load down through the leg, keeping weight through the heel light, the arches of the foot strong and lifted to help find balance. Avoid trying to ‘glue’ the heel into the ground and instead spread broadly through the ball of the foot keeping the lightness in the heel and the knee soft.
Focus the breath from the belly up through the spine into the ribs and out through the chest and shoulders – the inhalation lifts and lightens the spine, the exhalation is where we seek calmness and the focus to find balance.
Stay in posture for 4-6 breaths if comfortable, but if the ankle is wobbling uncontrollably then release and switch sides… I do not believe there is much value in trying to stay in a posture that creates agitation or anxiety – always better to come away and try again – offer a new experience and notice how the body responds to the change in focus.
Resettle centre before switching sides.
Vary the position of the lifted foot, to further challenge balance and stability – try resting the foot on the inner calf or inner thigh above the knee, avoid pressing against the inside of the knee. Holding the leg higher will demand of hip strength and this is where frustration might creep in – if the muscles around the hip joint are unable to support the weight of the leg, the foot will keep sliding down, so be prepared to settle with the foot connected lower down the supporting leg.
If your balance is really shocking, try standing with your back to a wall, heels a little forward of the wall, to avoid resting back against the wall. Knowing that the wall is behind you can sometimes change perception – visualise lengthening the back of your body up into the wall, lightly resting down through your standing leg into your roots – does this change things?
Try taking your practice outside if you get chance, be a tree out on the grass and notice how your body finds balance when not trying to negotiate a hard surface – the experience is completely different!
Day 24 – Narrow Crossed Legs
Sitting on chairs for long periods of time encourages us to lean back and sink through the middle of the body, weakening the abdominal and back muscles and encouraging the upper spine to round forward. When we move to sitting on the floor, it can be challenging to sit upright, especially if we have tight hips, knee injuries, or lower-back pain issues.
This seated posture – which I refer to as Narrow Crossed Legs, brings focused attention to the musculature from the lower spine into and around the hip joints – highlighting existing deep seated impingement and offering a route to release the spine and hips from the struggles of chair-sitting.
I have found this sitting posture to be hugely helpful in back care management and as a result, it has become a regular feature in my classes.
Benefits
Eases tension and strain through the lower spine, externally rotating out from the hips to release down through the groin into the legs and feet – offering a multi-muscle release through both sides of the lower body.
Creates space in the lower spine, improving circulation and promoting blood flow through the pelvis to the legs and feet. Brings attention to deep-seated impingement within the hips, offering relief to sciatica and associated knee/ankle pain.
Improves posture, balances the spine and helps to calm the nervous system, reduce stress and anxiety and calm the mind. Good preparation for other seated postures.
Awareness
Sit with the legs in front of the body, knees bent, cross the right ankle underneath the left, holding the knees upright – press the hands down into the ground either side of the hips, lean slightly forward in the spine – lift and pull the pelvis back then relax the buttocks into the ground. Lengthen up into the spine and rotate the upper thighbones down towards the ground, inching the feet a little further apart, directing the knees inward to line up with the hip joints, if possible. Relax out through the outer thighs, down into the outer calves into the outer ankles.
If the hips feel very tight or the knees or ankles are under strain, place a folded blanket, cushion or block underneath the buttocks to elevate the hips, this will reduce the pull from the lower spine into the hips and legs. Support under the knees may also reduce any strain between the hips, knees and ankles. Alternatively, try sitting against a wall to support and reference the spine, making sure the back of the pelvis is pulled right back into the wall.
Press down through the feet, legs and buttocks – inhale to lengthen up through the spine to the crown, exhale to relax down through the shoulders and arms to rest the fingertips into the ground, either side of the hips. Relax through the belly, pelvis, legs and feet.
Focus the breath deeply into the centre of the body – notice the upward spread through the spine and ribs into the chest. Be aware of sensation through the hips as the spine lengthens subtly upwards with the breath, notice how the body settles – if comfortable stay in posture for 4-6 cycles of breath. If there is a building sense of resistance in the hips or lower spine, release out sooner rather than inviting distress into the body.
To release, press down through the feet to support the legs back to an upright position, uncross the ankles to release the legs out in front of the body, before switching sides – crossing the left angle underneath the right.
The two sides of the body will often produce very different experiences in this posture, so don’t assume that you will need the same support for both sides. Investigate the differences between the two sides – be aware of the relationship between the lower spine, hip, knee and ankle in terms of mobility and sensation on each side – how are things different? Does the posture bring a sense of relief to the base of the spine and hips?
Lay back onto the floor bringing both knees into the belly to release after focusing the left side.
As suggested in the name of this sitting practice, the cross-legged position is narrow rather than wide from the hips – bringing attention deeper into the hip joints. In this posture it is possible to investigate hip impingement, which may be more deeply rooted and responsible for distress to the sciatic nerve. In my experience it is worth taking the time to find effective support to comfortably sit in this posture, as it offers great potential in the relief of lower back pain.

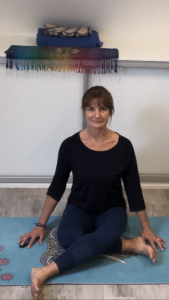
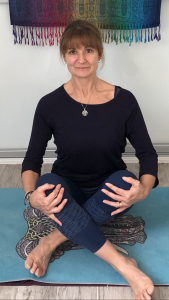
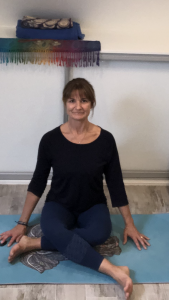

Day 25 – Pigeon Pose
Pigeon Pose is a great antidote to sitting for long periods and another of the back care focus postures, which I practice regularly. Having managed back pain for many years, this posture has been hugely beneficial in helping to maintain space, stability and ease of movement through the lower spine and relieve some of the deeper-rooted tension within the hips that impinges upon the sciatic nerve.
Over time I have found that this posture brings a wonderful feeling of calm and balance to the lower spine and hips and is hugely beneficial to the whole body.
Benefits
Balances and lengthens the spine, stimulates the nervous system, creates space in the abdomen and ribs and relieves stiffness in the chest, shoulders and upper back. Improves circulation and breath flow throughout the body, stimulates the abdominal organs – aids digestion.
Releases tension and compression in the lower spine, helps to mobilise through the hips, releasing down through both legs – Improves range of movement in outward rotation, relieving tension in the groin and outer hips on one side whilst focusing attention to the hip flexors and front of the body on the other. This posture is helpful in the management of lower back pain, sciatica and ‘iliotibial band syndrome’.
Awareness
From hands and knees slide the right knee forward from the hip, ease the heel across towards the left side of the pubic bone, taking the right knee out to the right – a little bit wider than the hip. Slide the left leg back as far as it will go, resting down into the front of the thigh – lengthen back beyond the knee to the lower leg to rest into the toenails. Square the pelvis towards the front of the mat then look back to make sure that the left leg is lined up with the hip. Be aware of the feeling of pull from the right hip into the knee – if the knee is under strain try gently flexing the ankle or adjusting the position of the knee, see if this changes the situation. Alternatively, try adding some support under the right buttock – this may help to ease the pull through the buttock into the knee. If the tensional pull is painful, lift up and off the knee to release out of posture – try the other side then come back to this side.
The position of the knee can also be adjusted to extend the focus – open up the angle at the knee to go deeper into the hip, be sure to avoid sacrificing the balance through the pelvis or allowing the spine to twist. Be attentive to the knee and the lower spine and avoid creating strain in either area.
With the hands forward of the body, press down through the hands, gently lengthen up through the arms to lift into the shoulders, relax the shoulder blades down over the back of the ribs, lengthen up through the spine into the crown. Walk the hands back a little closer to the body if possible, settle the spine into a gentle feeling of back bend, but avoid overly compressing into the lower spine.
Inhale and exhale slowly to settle through the pelvis down into the legs. Continue to focus on the movement of the breath, noticing any response in the pelvis and hips as the breath opens the ribs and lifts the spine – does the pelvis move subtly down towards the floor? Does the tensional pull from the hip to the knee change? Can you feel the front of the thigh in the back leg settle a little deeper into the floor? Where do you notice tension or resistance?
Aim to stay in posture for 4-6 breaths if comfortable, then lean forward, press down into the hands to left the weight carefully out of the front knee. Come back to all fours or step back into Dog Pose – this offers an opportunity to balance back through the spine and legs and release through the back of the knees. Finally rest back into Childs Pose
Come back to all fours to repeat on the other side – left knee coming forward.
As always, the two sides of the body will potentially have a very different experience of this focus and it is worth taking time to explore each side with equal attention. Notice what is different and if you have time, go into each side again, be aware of how things change with a second experience. I often find that there is great benefit in repeating a practice, especially if there is notable challenge. I also find that this route can be more comfortable than staying in posture for a long period of time.
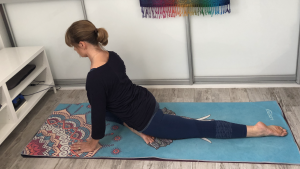
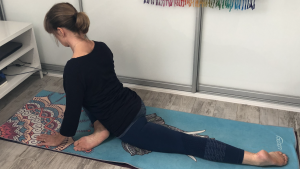
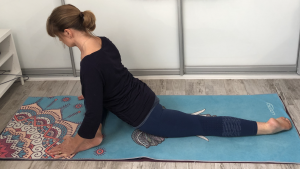

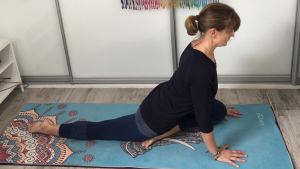
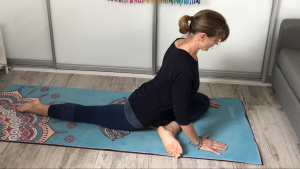
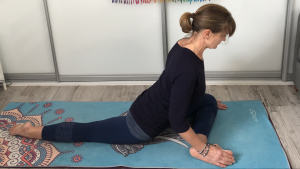


Day 26 – Head to Knee Pose
Seated forward bends are often challenging and the temptation to round the spine ‘to get there’ in this posture, means that it is easy to lose a lot of the potential benefit from this focus. Head To Knee Pose brings attention to the whole back of the body and when approached with awareness and a sense of ‘negotiation’ between the spine and the legs, it can offer a wonderful sense of relief from the overly compressed feel of the lower spine and tight hamstrings.
Benefits
Brings awareness and balance to the spine, improves circulation and calms the nervous system. Lengthens through the entire back body, creates space in the spine, shoulders, hips and groin and eases tension and strain through the upper back and legs. Stimulates abdominal organs, improves digestion. Helpful in the management and relief of back pain, sciatica, calf cramps and ‘restless legs’. Improves focus and concentration, calms the settles the mind, improving levels of stress, anxiety and insomnia.
Awareness
Sit with the legs extended in front of the body, bend the knees, hands either side of the hips. Press down into the hands and the back of the heels to lift the hips and lengthen back through the thighs, before resting down into the back of the legs. Bend the left knee to bring the left foot back towards the body, resting the bottom of the foot against the inner thigh of the right leg – roughly half way between the groin and the knee. Allow the left upper thighbone to rotate out and rest down towards the ground. If the hip feels tight or there is strain on the knee, try sliding the foot lower down the leg or put some support under the upper/outer thigh/knee – this may help to settle the hip and the knee. The foot can also come closer to the groin if preferred, but be aware of the pull into the knee. Balance weight down through the pelvis then gently flex the right ankle to lengthen down into the heel, relax the knee and shin.
Straighten up into the spine and relax the shoulders down, resting the hands/fingertips to the sides of pelvis. Inhale and exhale to settle through the base then on the next inhale, lift from the base of the spine – exhaling to ease forward over the extended leg, maintaining length through the whole spine. Rest the hands to the floor either side of the leg but avoid aggressively pulling from the back of the shoulders. Avoid the tendency to collapse the chest, keep the shoulders back and relaxed away from the ears – broaden across the collarbones. If there is any sense of rounding through the back of the ribs, pause in the movement forward. Check that the knee is still relaxed, inhale to lift and refocus the length of the spine, exhale inching forward – maintaining as much openness through the belly, ribs and chest as possible. Avoid leading with the chin.
The temptation is to push through the head or pull forward using the arms – try to focus the movement forward from the base of the spine – lift to lengthen. The forward bend then progresses inch by inch through the spine. Keep checking in with the extended leg, making sure that the knee is not locking and the thigh muscles are not braced. Try easing the knee a little more to find more space in the spine – negotiate between the leg and the spine to find the release through the back of the body. Find a calm resting place for the arms – either hands to the ground either side of the extended leg, or down to the foot if the back of the body allows.
It may feel that there is very little forward movement available in this posture and that is absolutely fine. Keep the focus of length in the spine with calmness through the back of the leg as the primary focus, rather than forcing the head towards the knee.
A folded blanket under the pelvis – slightly elevating through the back of the hips can help to make this posture a little more comfortable – alternatively try a light support under the knee of the extended leg – notice how the body responds and moves as a result of receiving the support.
Stay in posture for 4-6 breaths if appropriate – focus the breath to the belly to maintain space in the abdomen – notice how the ribs expand and broaden the breath into the back of the body. Notice how the spine moves with the breath.
Finally, inhale to lift upwards, steadily returning the spine to it’s base on the exhalation. Release the left leg forward, shake out both legs before changing sides.
Notice how differently the two sides of the body experience this posture – does one side feel much tighter than the other? Where do you feel most of the challenge? Is it the same both sides?
After giving attention to both sides, lay back and bring the knees into the belly gently, try not to push aggressively down into the lumbar spine.
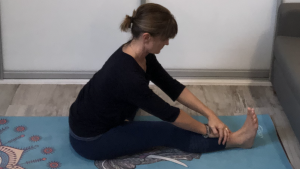
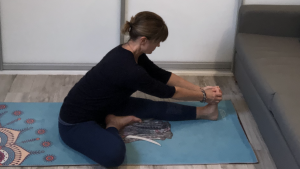

Day 27 – Squat Pose
For countless ages throughout time, human beings have been able to crouch all the way down into a resting squat for relaxing, working, cooking, communing, and even for using the bathroom. In many cultures across the world squatting is still a part of daily life, but in most developed countries – thanks to the invention of chairs, most of us have forgotten how to assume it. We sit in chairs to work, to travel, to eat and to relax – spending large amounts of time in a position which puts the spine under considerable pressure – immobilising the hips and weakening the legs.
Regular practice of Squat Pose brings us back to one of the body’s most natural movements, helps to reduce the negative effects of sitting and brings back the ability to ‘find our legs’ and use them to support the spine in a strong and balanced way.
Benefits
Lengthens and balances the spine, improves posture. Decompresses the lumbar spine, releases tension and strain in the spine, shoulders, hips, thighs, knees and ankles. Strengthens legs, feet and ankles, maintains harmonious function between hips, knees and ankles. Increases circulation and blood flow through the pelvis. Releases strain on abdominal organs, aiding digestion and improving function of the colon to help with elimination. Improves balance, concentration and focus, calms the mind.
Awareness
There are various ways to approach the squat, but this is one of my favourite routes – using a preparation version before attempting the full squat. Approaching the squat from the ground rather than from standing is also a little kinder to the knees and a great way to build up to more challenging variations.
From forward bend with knees relaxed, walk the hands forward, lift the heels and spread into the balls of the feet. Bend the knees deeply, dropping the buttocks down, draw back through the pelvis and lengthen up through the spine, resting the fingertips to the ground in front of the body. Allow the base of the spine to rest down, lift up through the ribs. Balance and spread through the balls of the feet with heels lightly elevated, focus the breath into the ribs, lengthening up through the spine into the crown, relaxing the shoulders down, spreading through the chest and collarbones, allow the pelvis to drop.
Bring attention to the knees – opening back up into forward bend if there is any sense of strain across the front of the knees.
Stay in the preparation squat for 2-4 breaths then lift up into forward bend to release the knees.
Return to the preparation squat to assess balance and comfort through the lower spine, knees and ankles – notice how the legs feel. It is worth coming in and out of the preparation squat a few times, as the action of squatting down will potentially become more comfortable with each attempt – waking up the muscle of the legs and preparing the knees, ankles and feet.
To deepen the squat, press down through the balls of the feet, lift the buttocks to draw back through the base of the spine, releasing the heels down to the ground as the pelvis drops back towards the floor. Keep the upper spine lengthening forward and up to help find balance. Spread the weight through both feet as evenly as possible, allowing the pelvis to drop, resting the elbows on the thighs, bringing the hands to meet in front of the chest – keep the neck long and the shoulders relaxed.
If the heels need to lift off the ground to find balance, that is fine – try to maintain a strong sense of connection through the balls of the feet, keeping the spine long and lifted slightly forward and up.
Notice how the body settles into the squat, the legs will be very ‘vocal’ when they have had enough. Release into forward bend before rolling the spine up to stand.


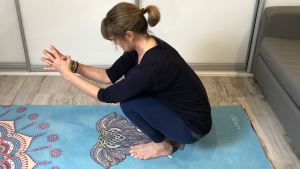


Day 28 – Cow Face Pose (Upper Body)
Mobility in the shoulders is hugely affected by our everyday habits in terms of upper body posture and restricted movement in the arms. Prolonged sitting, sedentary lifestyles and frequent use of phones and computers place the upper body under enormous strain and pressure, causing stiffness in the neck, upper spine and shoulders.
The traditional Cow Face Pose is a wonderful focus for the hips and shoulders, but in this practice we focus on the upper body separately, to bring attention to mobility in the shoulders, arms and wrists, without any excessive challenge from the base of the spine and hips. With regular practice, the whole upper spine will benefit.
Benefits
Brings focused attention to the upper spine, increases mobility, improving functional movement through the shoulder girdle, relieving tension and strain in the neck, shoulders and arms. Creates space in the chest, improving breath flow. Strengthens arms and upper back. Increases circulation and blood flow through the shoulder girdle and upper spine.
Awareness
Prepare for this focus with a general warm up through the shoulders and upper spine – shoulder rolls, shrugs, gentle moving the neck, overhead stretch etc. The warm up can be done sitting or standing – try to find length throughout the whole spine, before settling to focus on the upper body.
Stand with the feet under the hips, toes forward, spine long, shoulders relaxed. Bend through the right elbow, sliding the lower arm into the back of the body to rest into the lumbar space of the spine. Take the left arm back to settle underneath the right, arms resting against the back of the body. Inhale through the top of the chest – exhale to relax down through the shoulders, dropping the tailbone down. Focus the breath into the chest, noticing how the arms settle – if there is any strain in the shoulders or arms, try bringing the hands lower to rest on the back of the pelvis – release if painful. After 2-4 breath cycles, release the arms forward.
The next focus can be done sitting – find a seat which allows the legs to comfortably support the pelvis and lower spine, feet on the ground, hip width apart. If sitting in a chair, sit to the front edge of the seat, lengthen up into the spine, settle through the shoulders, relax through the belly.
Bring the right arm above the shoulder, bend through the elbow to drop the hand down centrally into the upper back. Elbow pointing toward the ceiling, drop through the shoulder blade and settle the arm into the joint. Bring the left hand up to support the arm in place – inhale to lengthen up into the spine, bringing the head up onto the top of the neck, exhale to settle the shoulders. Avoid forcing the arms and shoulders into position, notice how the lower spine deals with the demand from the shoulders and arms, try not to collapse through the abdomen.
Release and change sides.
Bring the right arm back up into the same position and settle through the shoulder, bring the left arm into the back of the body, bending through the elbow to reach up between the shoulder blades – allow the hands to connect if they meet. The shoulders will not respond to force, so allow the hands to settle against the back of the body if they do not meet.
Inhale and exhale slowly, focus the breath through the chest into the shoulders – hold in place for 4-6 breaths if comfortable.
Carefully ease the arms out from the back of the body to release, move the shoulders and neck carefully.
Repeat on the other side.
As with other areas of our focus practices, the two sides of the body will often experience this posture very differently, there will invariably be more tension on one side than the other – avoid trying to force the movements. Notice how the whole spine attempts to accommodate the practice on each side, making alignment of the spine and important feature throughout. Notice the effect that the breath has – allow the breath to move broadly through the ribs – this will help to maintain calmness through the neck and shoulders.

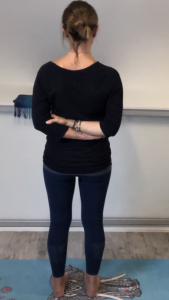
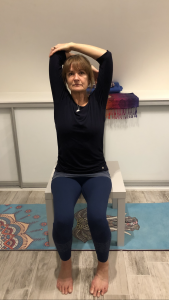
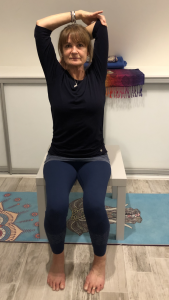
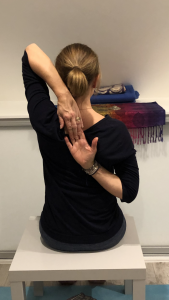
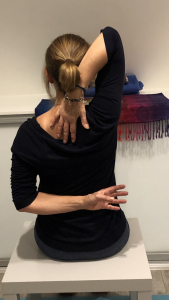
Day 29 – Yoga Nidra
Yoga Nidra – a ‘yoga sleep’ – is a conscious relaxation practice that is intended to induce total physical, mental and emotional relaxation. When we engage with the practice of Yoga Nidra, we enter a state of deep relaxation that isn’t quite as deep as if actually being asleep. We are essentially in the furthest state of relaxation whilst remaining conscious and aware of our surroundings. Rather like during a guided meditation, we are encouraged to allow waking thoughts and worries to float out of our minds – encouraging our bodies and minds to find peace.
During my first experience of Yoga Nidra I fell into a deep unconscious sleep, but over time with continued practice, I have come to fully appreciate how totally relaxed and blissful the conscious experience can feel. In my experience the benefits of this practice extend far beyond the more familiar relaxation at the end of a class and it has become a regular feature of my practice.
Benefits
Accessible to anyone, no experience or equipment required and can be practiced at any time of day.
Offers a deeply restorative and restful experience – relaxing the body and the mind, fostering feelings of peace and clarity. Calms and balances the nervous system, deepens and improves breath flow. Energises and nourishes the whole body. Heightens awareness and focus, transforms negative ways of thinking, behaviours and habits. Decreases anxiety and stress and useful in management of insomnia, chronic pain and depression.
Awareness
Find somewhere quiet and comfortable for this practice, somewhere where you will not be disturbed. Yoga Nidra is generally practiced lying down, to allow the body to rest, props, pillows and blankets can be used to get into a totally comfortable, restful position.
A typical Yoga Nidra practice is guided to take attention to specific places through a series of steps – to move into a state of deep, conscious sleep. The mind remains awake – having shifted beyond the dreaming state of consciousness into the deep sleep state.
Each step is intended to travel deeper into an altered state of consciousness—the state between asleep and awake—fully conscious but the body and mind are fully at rest and ease.
Sankalpa is set before the practice begins – a positive intention, rather like a resolution. In Yoga philosophy Sankalpa refers to heartfelt desire – a solemn vow or resolve to do something. This is identified by the conscious mind at the start of the practice and becomes embedded in the subconscious during deep relaxation.
Unlike a goal, which is a personal need to accomplish something, the concept of Sankalpa turns inward to connect with the heart’s highest intention. When setting a conscious intention at the beginning of the practice, then let go and allow for deep relaxation of the body, mind and emotions – the unconscious opens up to new ways of thinking, healing, and fulfilling conscious intentions.
The following audio practice is a 15 minute, short script practice – enjoy!

Day 30 – Mindfulness
Our 30 Days of Yoga together would not be complete without some mention of Mindfulness in our practice. Learning how to be fully engaged in the present moment allows us to settle with our thoughts and emotions without distraction or judgement.
On the most basic level, being mindful means being focused on one thing – a conversation, a project, a task in hand – without distraction. Being totally aware of what is being sensed and experienced, paying full attention to what is in front of us without being in our heads or lost in thought.
At a deeper level, meditation is a more structured approach to mindfulness. Meditation teaches us to sit with challenging emotions as and when they arise – when we sit to practice or when we are triggered by circumstances or situations in everyday life. We can be present with joy, anger, sadness or excitement – we can be present without being caught up in it. Learning how to anchor ourselves in the present can be hugely challenging – especially as many of us have a tendency to dwell on yesterday or worry about tomorrow. Meditation can help bridge the gap between emotions from the past and eagerness of the future – teaching us how to be more present in life.
This final day of practice is dedicated to the simpler focus of mindfulness, which I would like to expand with a deeper focus on meditation in January.
Benefits
Mindfulness is accessible anywhere, at any time and just a few minutes daily can make a huge difference.
Promotes emotional health – increased sense of wellbeing, better focus and concentration, improved self-awareness and self-esteem – supports positive feelings towards self and others – fosters kindness. Helps to reduce levels of stress and anxiety. May help to diffuse difficult or confrontational situations. Can lead to a more structured meditation practice.
Awareness
As a starting point, there are some simple techniques to bring mindfulness into daily routine….
*During every day activities – eating a meal, washing dishes, walking the dog – pay full attention to the activity in hand, bring awareness to the breath or to sensations arising.
*When waiting – standing in a queue, waiting for someone to turn up to a meeting – bring attention to the breath, to the sounds and sights or even the thoughts that arise.
*Just before starting an activity – take a couple of mindful breaths before beginning a yoga practice or starting a regular exercise routine, before entering a meeting at work or giving a presentation.
In these situations, use the sensation of the breath as an anchor for awareness in the present moment. Establish mindfulness on the narrow focus of just the breath sensation. Feel the breath as it goes in, and releases out and the pause between in and out. Do not try to control the breath. Simply let it come and go. Bring as much attention, as completely and continuously as you can to the direct sensation of the breath. Notice the effect on your thoughts and your breath….
Be careful not to try too hard. Don’t try to make anything happen, or to achieve any special states or any special effects! Simply relax and pay as much attention as you can to the present moment, as it is.
Practicing mindfulness in this way can be a useful step towards a more structured and ‘formal’ practice of meditation – one moment of mindfulness, one breath when we are truly present, can be hugely profound….
**WATCH THIS SPACE FOR JANUARY’S ‘7 DAYS OF MEDITATION’ FOCUS**
